Tuesday, 29 July 2014

Tadka Dal

Hello boys and girls!

Welcome to cooking with Varun! A few years ago, when I hadn't quite popped my cooking cherry, I moved to Northern Ireland for a project. As is the norm, I was booked into a hotel for the first two weeks by my company until I could find a place of my own. The good thing about living in a hotel for any period of time is that you don't have to pick up after yourself. Now I'm borderline OCD but even I have days when there just isn't enough time in the morning to put everything back where it belongs or place toiletries at right angles and whatnot, so it's nice to come back to a made-up hotel room at the end of the day. The not so good thing is, after day 4, you have a food conundrum. Do you order the overpriced room service? Or do you get off your bum and walk across the street to the Chinese place or perhaps, a little farther down to the bar and grill?

Fortunately for me, I had a friend (and soon to be future roommate #1) on the same project, living not far from my hotel along with another 2 people (one of whom, would become roommate #2 and the other, refugee #1) and the culinary prowess of roommate #1 was quite remarkable so a fatherly invite to dinner could not be passed up on. So after 5 days of eating out, I headed off to dinner to my friends place in the early hours of the evening. Once I got there, I was buzzed into the building and greeted at the door with a bottle of Corona and a Wii controller. Before I could murmur my thanks, I was led to the living room and was soon involved in a heated game of Wii tennis where several mothers and sisters were fondly remembered as we cursed, grunted and perspired our way through several sets of hell until we finally collapsed on the couch, suckling on the mouths of the beer bottles for dear life. While we were dancing this rather ungainly tennis tango, roommate #1 was in the kitchen doing what he did best. Sipping whisky and making dal. A wonderful dal with garlic, chillies, onions, tomatoes and a whole lot of love. I was fortunate enough to get to watch him cook this dal on several occasions before I tried it for myself and despite what we Indians call, 'haath, haath ka farak', it was still special. And in case you're wondering, 'haath, haath ka farak' is the subtle difference between the same food cooked following the same recipe by different people. (Also, if you didn't already know, you can get just as good game results on a Wii by sitting on your couch flicking your wrist.)

Today's recipe, as you have doubtless guessed, is my take on that superb tadka dal.

For Tadka Dal, you will need the following:

Toor dal                                1 cup (Because toor dal is my favourite.)
Onion                                   1 medium
Tomato                                 1 medium to large
Jeera (cumin)                       1 tbsp
Green chillies                        2-3
Garlic                                   2 cloves
Dhaniya (coriander) powder   2 tsp
Red chilli powder                   2 tsp
Jeera (cumin) powder           1/2 tsp
Haldi                                    pinch
Salt                                      to taste    
Coriander (dhaniya) leaves
Ghee                              
 
Prep:
  1. Dump the dal in the pressure cooker and wash it 2 or 3 times in cold water.
  2. Chop the onion.
  3. Chop the tomato.
  4. Chop the green chillies.
  5. Chop the garlic.
  6. Roughly chop the coriander leaves.
Method:
  1. Turn on the gas.
  2. Bung the pressure cooker on.
  3. Add water to the cooker so that the dal is submerged under about 2 fingers of water.
  4. Pinch in the haldi and a sprinkle of salt.
  5. Slap the lid on and crank the burner up to high.
  6. Wait for the pressure cooker to whistle 4 times.
  7. (In the meantime) Turn on another burner.
  8. Bung a pan on.
  9. Splash in some ghee. (Who am I kidding? A lot of ghee!)
  10. Count to 20.
  11. Toss in the jeera.
  12. Roll in the chillies.
  13. Add in the garlic.
  14. Pop in the onion.
  15. Cook until translucent. (The whistles should be on their way about now.)
  16. Add in the tomato.
  17. Sprinkle on the dhaniya powder, red chilli powder and jeera powder.
  18. Cook until the ghee separates from the tomatoes. (Keep an ear out for the whistles.)
  19. Cook another few minutes.
  20. Turn off the burner.
  21. Turn the pressure cooker off if it's had it's 4 whistles. 
  22. Wait until the residual steam leaves the pressure cooker.
  23. Unlock the pressure cooker lid. 
  24. Turn the burner on.
  25. Add water to the dal if it's gone too thick. If it hasn't cooked all the way through, splash in some water and let it simmer or give it another whistle.
  26. If it's too runny, crank the heat up until some of the water evaporates.
  27. Mix in the contents of your pan.
  28. Add salt to taste and cook for a few.
  29. Turn off burner.
  30. Sprinkle the chopped coriander leaves.
  31. Stuff face.
  32. Bask in the glory of your successfully executed dish.
 
Tip: Accompany your dal chawal with a sookhi sabzi for a winning combination!

And remember, overeating is a myth. A full tummy is a happy tummy!


Monday, 28 July 2014

Chilli Garlic Mushrooms

Hello boys and girls!
Welcome to cooking with Varun! Are you vegetarian? Do you have vegetarian friends? Do any of your friends follow the age old tradition of not eating meat on certain days because they were told not to but have no idea why? Do affirmative answers to any of these questions hold you or your friends back from cooking what you want? Do you have to shroud your cravings in a veil of secrecy because you are afraid of offending someone? Do you find yourself 'settling' for something despite wanting something else on account of these constraints? Yes? Well tough. Different people do different things. But that's no excuse for you to feel hard done by. Adapt!
Now that the bad cop routine is over, let's take you over to the good cop. You know we all have days when we want to have 'something nice' for dinner. My roommate, Ms. Popularity, was no different. I'd ask, 'What do you want for dinner?', only to encounter the very cryptic, 'Something nice!'. To a hardcore meat eater like me, those 2 words would conjure up visions of chilli chicken and pork chops and thai chicken curry and juicy prawns. As I'd begin planning with gusto, I'd remember what day it was. Tuesday. Vegetarian day. (Tinkling sound as my dreams shatter.) But then I discovered that twisting a few recipes this way and that, yeidled results that were just as good and didn't really feel like 'settling'. Take today's recipe for example; you get the Chinese food you love without compromising on flavours and you get the satisfaction of knowing you've made someone happy. After all, that is the whole point of cooking right? To make people happy? 
The best part is, there isn't a whole lot of prep required and it cooks in 15 minutes. Dry it out to eat as a starter or eat it as it is with a side of noodles or fried rice. Either way, everyone's a winner!
For Chilli Garlic Mushrooms, you will need the following:
Mushrooms                       300 gms (Big meaty ones if you can wangle them)
Green chillies                    8-10 (Use fewer if you don't want it too hot)
Garlic                               4 cloves
Ginger                              1 inch piece
Green pepper                    1/4
Red pepper                       1/4
Onion                               1 small
Vegetable stock cubes        2
Cornflour                          1 tbsp
Soy sauce                          big splash
Vinegar                             not so big splash
Sugar                                pinch or two
Oil

Prep:
  1. Cut the mushrooms into quarters.
  2. Take the top off the chillies and slice them vertically.
  3. Mince the garlic.
  4. Peel and mince the ginger. (I just toss the ginger and garlic in a grinder and wazz it up.)
  5. Cut the green and red peppers into respectable sized squares.
  6. Slice the onion into big pieces.
  7. Dissolve the stock cubes in a cup of water.
  8. Dissolve the cornflour in a small cup of cold water. (Cold. Not warm. Not room temperature. Cold.)
Method:
  1. Turn on the gas.
  2. Bung a pan on.
  3. Splash in some oil.
  4. Toss in the chillies.
  5. Pop in the ginger and garlic.
  6. Breathe in the gorgeous aroma.
  7. Cook until the garlic goes light brown.
  8. Add in the vegetable stock.
  9. Bring to a boil.
  10. Drop the heat down to low.
  11. Slide in the onion.
  12. Toss in the mushrooms.
  13. Plop in the peppers.
  14. Splash in the soy sauce. (Add more if you want it darker.)
  15. Sprinkle in the vinegar. (You don't need to add salt. The stock cube, soy sauce and vingear have enough.)
  16. Slap a lid on for a couple of minutes.
  17. Tick tock.
  18. Take the lid off.
  19. Add in the dissolved cornflour a little at a time to thicken the sauce.
  20. Pinch in the sugar and cook for a few minutes until the sauce reaches the desired consistency.
  21. Turn the gas off.
  22. Serve with noodles or fried rice (or by itself).
  23. Stuff face.
  24. Bask in the glory of your successfully executed dish. 

Tip: Don't overcook your peppers. They don't taste very nice if they get soggy.

And remember, overeating is a myth. A full tummy is a happy tummy!

Thursday, 17 July 2014

Matar Paneer

Hello boys and girls,

Welcome to cooking with Varun! If I say 'paneer.. paneer.. paneer.. paneer', quickly under my breath, is it 'mutter' paneer? Now now, stop shaking your head in disbelief. I know that was bad.. what's worse is, it wasn't even close to being my worst joke!

I'm sure most vegetarians, have at some point in time, been told that food on the vegetarian end of the menu at an Indian restaurant pretty much just swaps over the chicken (or other meat) for paneer, which is true to a degree given that tikka masalas and butter masalas and chilli whatever all have the same taste foundation. Today's dish is an exception to the rule (unless someone out there is serving matar chicken) and despite anything non-vegetarians say about vegetarian food being less cool, is as good as any dish to order.

Now I'm not really a matar person.. I'm a fussy eater that only eats some veggies if they are cooked a certain way. For instance, I don't eat gobi (cauliflower). Despise it. But grate that sucker down, throw in some masalas, stuff it in atta, roll it out and make me a paratha and I'll have 6 before you realize there isn't any left to feed anyone else. Matar is the same. Peas on the side? No sir. Peas in my rice? Nein! But matar in my paneer or with my aloo? Oh yeah!

So if you're the same, and are looking for a way to use the matar in your freezer, stick with me and together we will find way to incorporate all those ill fated veggies into dishes we actually eat! For now, matar paneer.

For my Matar Paneer, you will need the following:

Paneer 300 gms
Peas 2-3 cups
Onion 1 large
Tomatoes 2 (and a shot of puree)
Jeera 2 tsp
Green chillies 2
Ginger garlic paste 1-2 tsp
Red chilli powder 2 tsp
Coriander powder 2-3 tsp
Jeera powder 1 tsp
Garam masala
Coriander leaves
1/2 tsp
handful
Salt to taste
Oil
Prep:
  1. Open the packet of paneer.
  2. Cut the paneer into cubes.
  3. Soak the cubes in hot water to soften.
  4. Grind the onion.
  5. Puree the tomatoes.
  6. Chop the chillies.
  7. Chop the coriander leaves.
Method:
  1. Turn on the gas.
  2. Bung a kadhai on.
  3. Splash in some oil.
  4. Count to 20.
  5. Toss in the jeera.
  6. Roll in the chillies.
  7. Pop in the onions. (I don't need to remind you to avoid the spatter, do I?)
  8. Drop in the ginger garlic paste.
  9. Mix well.
  10. Cook until the onions are nice and brown.
  11. Sprinkle in the chilli, coriander, jeera and garam masala powders.
  12. Mix.
  13. Pour in the pureed tomatoes.
  14. Mix.
  15. Cook until the the oil separates from the tomatoes.
  16. Drain the paneer and drop the pieces into the kadhai.
  17. Mix.
  18. Drop in the peas.
  19. Watch as some of them bounce off the side and roll away.
  20. Retrieve the rollers.
  21. Pop them in with their pod mates.
  22. Mix.
  23. Add in a cup of water.
  24. Add salt to taste.
  25. Mix.
  26. Crank the heat up to bring to a boil and then drop to a simmer.
  27. Simmer for about 10 minutes.
  28. Turn the gas off.
  29. Sprinkle on some garam masala and chopped coriander leaves, pop the lid on and let it sit for a few minutes.
  30. Serve with hot rotis.
  31. Stuff face.
  32. Bask in the glory of your successfully executed dish.
Tip: If it tastes too tomato-ey after you add the puree, a pinch of sugar will balance it out.

And remember, overeating is a myth. A full tummy is a happy tummy!

Thursday, 26 June 2014

Magically Delicious Pepper Chicken

Hello boys and girls!

Welcome to cooking with Varun! It's no secret that I love cooking, so it shouldn't come as a surprise that I love cooking for people. In fact, it makes me quite upset when I invite people over and the food is anything short of perfect or isn't enough (involuntary shudder).

Some time ago, I raided the fridge for ingredients to cook something for dinner. Unfortunately, my fridge was not unlike Old Mother Hubbard's cupboard at the time so I had to call upon a professional for expert advice on how to best utilise my limited resources. After speaking to my mom (I did say professional!), I decided to cook some pepper chicken (emphasis on the 'some'). So I cut up the 3 chicken thighs I dug out from the fridge, marinated them, cooked them and sat down to eat as my roommate brought me hot roti after hot roti leading me to eat far more than I had originally intended leaving the poor girl sans chicken for her last roti. As I watched her finish her roti with mango pickle I sank lower and lower in my seat in shame but despite the guilt, I couldn't help but think about how good that chicken had turned out!

Today's recipe is that magically delicious pepper chicken. The seed of unbridled greed. The destroyer of friendships. The key to taking over the world! (Okay, maybe not that last one..)

For Magically Delicious Pepper Chicken, you will need the following:

Chicken                           500 gms (boneless if you can wangle it)
Onion                              1 large
Yoghurt                            2 dollops
Ginger garlic paste           2 tsp (or make it fresh)
Garam masala                  3/4 tsp
Pepper                             3-4 tsp (freshly cracked!)
Salt                                  to taste
Kadhi patta (curry leaves)  handful
Oil

Prep:
  1. Wash and cut the chicken into cubes.
  2. Grab a clean bowl.
  3. Plop in the chicken.
  4. Dollop in the yoghurt. (You only want enough to coat the chicken and a tiny surplus.)
  5. Put in the ginger garlic paste.
  6. Sprinkle in the garam masala.
  7. Add in the pepper.
  8. Add in the salt.
  9. Mix well.
  10. Stick it in the fridge for an hour.
  11. Chop the onion.
Method:
  1. Turn on the gas.
  2. Bung a pan on.
  3. Splash in some oil.
  4. Count to 20.
  5. Float in the kadhi patta.
  6. Drop in the onion.
  7. Fry the onion until light brown.
  8. Retrieve the chicken bowl.
  9. With a fork, spear the chicken pieces and add them to the pan.
  10. Sear the chicken. (Wait till it goes from pink to slightly darker than white).
  11. Add in the yoghurty dregs from the chicken bowl.
  12. Splash in some water.
  13. Pop the lid on.
  14. Drop the heat to low.
  15. Cook for about 20-30 minutes. (Periodically stir to make sure the chciken doesn't stick to the bottom of the pan and burn. You can add a splash of water if it dries out too soon)
  16. Add salt to taste. (Remember, you've already added salt in the marinade so be careful.)
  17. Add some more pepper if you want. (I always do.)
  18. Pop the lid back on until the chicken is cooked all the way through.
  19. Turn the gas off.
  20. Serve with hot rotis.
  21. Stuff face.
  22. Bask in the glory of your successfully executed dish.

Tip: This isn't a gravy dish. You can put in some extra yoghurt for a little more masala but too much will ruin it.

And remember, overeating is a myth. A full tummy is a happy tummy!

Monday, 16 June 2014

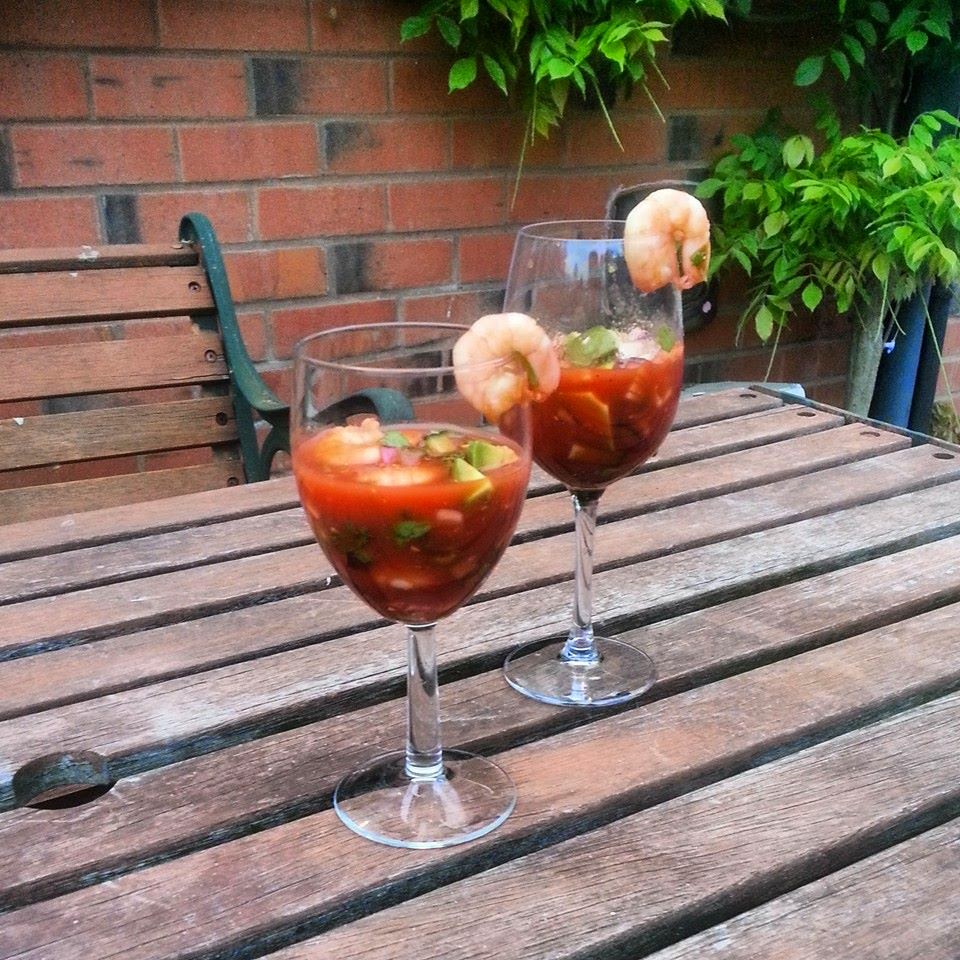
Mexican Prawn Cocktails

Hello boys and girls!

Welcome to cooking (or in this case, putting stuff together) with Varun! My earliest memory of a prawn cocktail is from back in college when my friends and I had gone to a restaurant where someone had the bright idea of ordering it. We didn't really know what it was or how it would taste but we figured it had the words 'prawn' and 'cocktail' in the name, so how bad could it be? Needless to say, we weren't disappointed and it has since become one of my favourite appetizers.

My most recent memory of prawn cocktails is from Barcelona. One night, as we were wandering around the city after dinner, we ran into a Indian bloke and his friends who after a few minutes of random chatting suggested we try out this nice Mexican restaurant called 'Rosa Raval', and gave us a card with the address. The next night, since we couldn't agree on where to go, we decided to give the Mexican place a shot and set off, map in hand into the heart of the old city. A half hour of walking through winding lanes in the semi darkness as the number of people thinned around us and a few very unsettling 'Hostel' references later, we found ourselves standing outside the restaurant. A less than impressive looking nondescript hole-in-the-wall with loudish music and dim lighting. With no other place in sight, we decided to go in and try our luck. My general feeling about the place took an upturn after a pretty waitress handed us some menus and took us to a table. It was further improved when we ordered margaritas and even more so when we were served our chilled prawn cocktail with tortilla chips (followed by the world's best smoked pork burritos!). As we swapped drinks and fought over the last prawn, all our initial apprehensions melted away and we settled comfortably to enjoy the sultry Spanish evening.

This recipe is my take on a Mexican prawn cocktail and it goes thus..

For Mexican Prawn Cocktails, you will need the following:

Prawns 300 gms
Jalapenos 2 (6-8 pieces if you've got the sliced bottled kind)
Celery 2 sticks
Cucumber 1/4
Red onion 1 medium
Tomato juice 3 cups
Tomato ketchup 2-3 tbsp
Tabasco few good shakes
Lemon juice from half a lemon
Avocado 1
Pepper to taste
Salt to taste
Cilantro/Coriander few sprigs

Prep:
  1. Cook the prawns by dunking them in boiling water for a few minutes until they become pink. (Don't overcook them! If they roll up into a ball or are hard to the touch, they're overcooked.)
  2. Chop the onion.
  3. Chunk the cucumber.
  4. Mince the jalapenos.
  5. Cut the celery.
  6. Chunk the avocado.
  7. Chop the cilantro/coriander.
  8. Open the carton of tomato juice. (Or juice your tomatoes.)
Method:
  1. Grab a big bowl.
  2. Toss in the onion.
  3. Bang in the cucumber.
  4. Shake in the jalapenos.
  5. Bounce in the celery.
  6. Plop in the prawns.
  7. Pour in the juice.
  8. Stir in the ketchup.
  9. Shake in the tabasco.
  10. Squeeze in the lemon juice.
  11. Add salt and pepper to taste.
  12. Chuck in the avocado.
  13. Sprinkle on the cilantro/coriander.
  14. Mix well.
  15. Stick the bowl in the fridge for a couple of hours to chill.
  16. Serve in a cocktail (or similar) glass. (You can stick a prawn on the rim to make it look pretty!)
  17. Stuff face.
  18. Bask in the glory of your successfully executed dish.


Tip: To tell if an avocado is ripe, break the sticky bit off. If the colour inside is yellow, it's ripe.

And remember, overeating is a myth. A full tummy is a happy tummy.